
Uploading and saving files or images to SharePoint Document Library from PowerApps is one of the most important functions that a real world app requires. There is no out of the box solution for uploading images or files directly from PowerApps. Hence there are various solutions that that App Developers came up over the last few years. All of them involves using PowerAutomate as the mediator to solve this. Some of the initial solutions that surfaced over the internet involves lots of data formatting and cleaning before you could actually start using them.
With the recent changes in PowerApps and PowerAutomate, the solutions also evolved with less codes and steps involved in getting the data from PowerApps and transforming them in PowerAutomate flows to create the the files in SharePoint Library.
In this tutorial I will explain one of the easiest and shorted solution to upload files from PowerApps to SharePoint Library.
- Creating the flow in PowerAutomate.
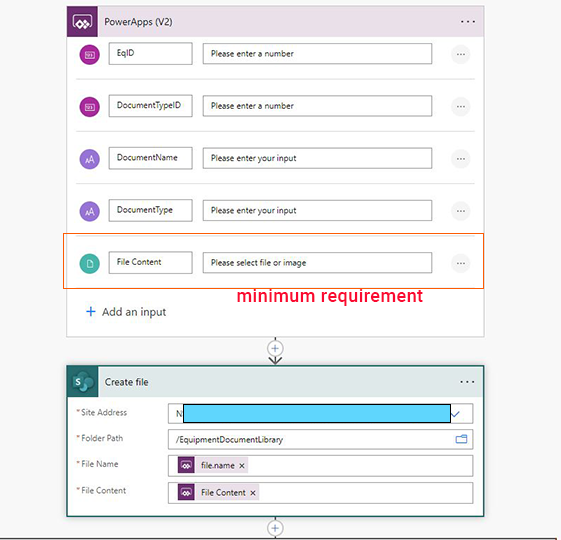
The flow is triggered using the PowerApps(V2) where we get the required data from PowerApps. At minimum the data should include the ‘file’ field filled. The rest of the fields in this example are optional as in this example I am updating the file properties once the file is created.
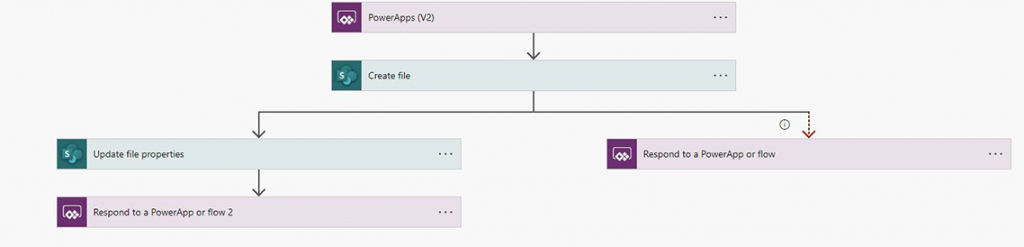
To create the file in SharePoint Document Library, use the properties of the file.
To show a notification when file is uploaded, a respond to PowerApps action is added with the Result Text True or False.
2. Adding the flow to PowerApps.
As you can see that my flow asks for 4 fields. EqID, DocumentName, DocumentTypeID and Details and I have to pass all these data from my PowerApps app. The following code is when you have an attachment control to upload files. I will show how you can add attachment control to PowerApps in another Post.
UpdateContext(
    {
        Result:FlowName.Run(
            _SelectedEqID,1,"Risk Assessment", "Risk Assessment",
            {file:
                {
                    contentBytes: First(RiskAttment.Attachments).Value,
                    name:  First(RiskAttment.Attachments).Name,
                }
            }
        )
    }
);

//This is for Notification if successful
If(Result.result="True",Refresh(EquipmentDocumentLibrary);UpdateContext({ResetRiskAttchment:false});UpdateContext({ResetRiskAttchment:true});Notify("Risk Assessment Uploaded",Success,3000)   );
By adding conditional steps, you can improve this flow to be used as the only flow that is used through out the app to upload files into various Document Library and update the file properties.
You are welcome to share your thoughts on this solution and write comments below.