Uploading and saving files or images to SharePoint Document Library from PowerApps is one of the most important functions that a real world app requires. There is no out of the box solution for uploading images or files directly from PowerApps. Hence there are various solutions that that App Developers came up over the last few years. All of them involves using PowerAutomate as the mediator to solve this. Some of the initial solutions that surfaced over the internet involves lots of data formatting and cleaning before you could actually start using them.
With the recent changes in PowerApps and PowerAutomate, the solutions also evolved with less codes and steps involved in getting the data from PowerApps and transforming them in PowerAutomate flows to create the the files in SharePoint Library.
In this tutorial I will explain one of the easiest and shorted solution to upload files from PowerApps to SharePoint Library.
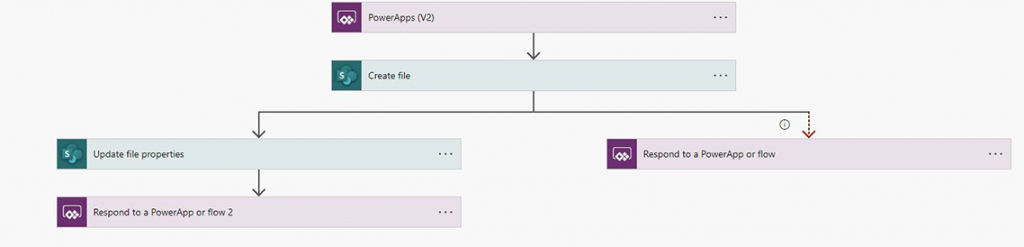
Creating the flow in PowerAutomate.
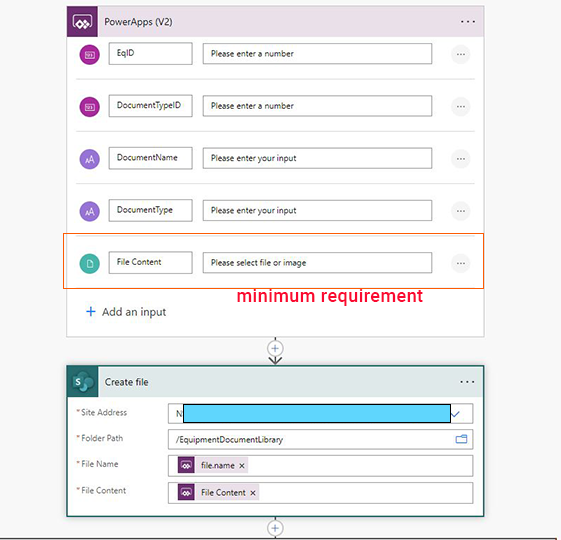
The flow is triggered using the PowerApps(V2) where we get the required data from PowerApps. At minimum the data should include the ‘file’ field filled. The rest of the fields in this example are optional as in this example I am updating the file properties once the file is created.
To create the file in SharePoint Document Library, use the properties of the file.
To show a notification when file is uploaded, a respond to PowerApps action is added with the Result Text True or False.
2. Adding the flow to PowerApps.
As you can see that my flow asks for 4 fields. EqID, DocumentName, DocumentTypeID and Details and I have to pass all these data from my PowerApps app. The following code is when you have an attachment control to upload files. I will show how you can add attachment control to PowerApps in another Post.
UpdateContext(
    {
        Result:FlowName.Run(
            _SelectedEqID,1,"Risk Assessment", "Risk Assessment",
            {file:
                {
                    contentBytes: First(RiskAttment.Attachments).Value,
                    name:  First(RiskAttment.Attachments).Name,
                }
            }
        )
    }
);

//This is for Notification if successful
If(Result.result="True",Refresh(EquipmentDocumentLibrary);UpdateContext({ResetRiskAttchment:false});UpdateContext({ResetRiskAttchment:true});Notify("Risk Assessment Uploaded",Success,3000)   );
By adding conditional steps, you can improve this flow to be used as the only flow that is used through out the app to upload files into various Document Library and update the file properties.
You are welcome to share your thoughts on this solution and write comments below.
With the current internet speed available in Perth, you could switch to fully cloud hosted file storage and backup system instead of having them stored on local computers and servers. In the last 2 years, the pandemic has taught us that the work files needs to accessible 24 hours from anywhere especially when you have a team to collaborate with. The forward thinkers have switched to fully cloud hosted storage systems and took the advantage of 24 hours accessible data. As the number of people of working from home or remotely increased during the pandemic due to lock downs in Perth and also travel restrictions in WA, cloud storage became more beneficial than ever.
Share Files/Documents with co-workers
Most cloud hosted storage systems comes with features such as sharing with others and version controlling. When you have files or documents that you have shared with co-workers they can contribute anytime without physically being in the same office. It’s important to control the access level when sharing files and documents. Sometimes you may want only give read access not the edit or modify access. Your IT department can help with the file or folder permission and manage user access level.
Use an Automated Approval Process
One of the most important aspects of Business Automation is having an Automated Approval Process. Having an automated approval system completely removes the wait time that the staff have to spend on managers approval. This improves the overall efficiency within the organisation. Example scenarios for an automated approval process includes:
Purchase Requests
Leave Requests
Work form home requests
Inspections Approvals
Travel Expense Approvals
When creating an Automated Approval Process for purchase requests, staff could be assigned with certain limits on purchase then if their request is higher than their limit, the request then can be redirected to their line manager who can approve it. If the request is below their limit then the system can automatically approve the request and send the request to purchasing department to order it from the supplier.
Use an Automated Reporting System
Another important aspect for a business is to have access to realtime reporting on activities and progress on projects. If you are a small or medium size business owner and have multiple manager at different location at different department, getting them at same room for project updates and progress in nearly impossible. However with the new technologies such as online meetings and project reporting softwares, managers can update the progress and report realtime to their senior.
Create an all inclusive business process
When moving to an automated business process, it’s crucial to include all aspects of the business in the process cycle. It should be started from the bottom of organisation and move up to list all all the departments and their functions. Then move to their managers and their seniors etc until the top is reached. This will cover the whole business and direct the automation process to the right department/section.
![[Solved] How to upload files to SharePoint Library from PowerApps?](https://n-digits.com.au/wp-content/uploads/2022/09/upload-image-to-sharepoint-library-1080x675.jpg)